Where testing has been done and, perhaps, a number of documents have been produced to support the conclusions reached, it will be necessary to include them in the database for future reference. This is done using the Working Papers tab.
Click on the tab and then click "Add New" to bring up the following screen:

Subject: give your Working Paper a meaningful title.
Comments: here you can write an overview of what the working paper file contains.
Select file: use the ‘Choose File’ button to locates where your working paper file currently is and then click on it to populate this field.
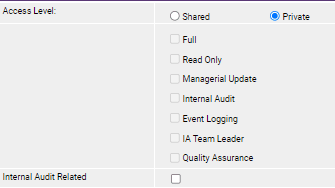
Using the radio buttons on the right of the screen you can elect for the working paper file to be for your own private use or shared use; if you click on "shared" you are presented with a further selection:

Make your selection by ticking the relevant box. Click "save" in the top left-hand corner and the work paper file is attached to the Control Screen.
The “Updated By” and “Related To” fields are completed by the system.
If you wish to download to your desktop or other area of your computer the individual work papers you can do it from here. Place a check mark in the box to the right of the screen against the working paper(s) you wish to download, then click on ![]()
Download the file and click ‘open’. Alternatively, press ‘Save’ and you are presented with a choice of areas in which you can save the work papers for reviewing later.
To delete any working papers, place a check mark in the box against the relevant entry and click on ![]() .
.
The ![]() buttons at the top left-hand side of the toolbar move you around within the Control Listing section, moving one control forwards or backwards per click.
buttons at the top left-hand side of the toolbar move you around within the Control Listing section, moving one control forwards or backwards per click.
The "Print" button will allow you to print what is on the screen; note that it will only print what the screen shows so if, for example, you have the “Compliance Test” window open that will be included in the print, the Diary Entries section will not.
The "Add New" button serves the same purpose in this screen as it did in the Control Listing screen, in this case it opens a new, blank Control Screen.
The ![]() button allows you to delete the control currently being displayed; note however that if the control currently being displayed has already been scored in the matrix, i.e., one or more risks have been assigned to the control, then the system will not let you delete it, an error message to this effect will be displayed. To solve this, go to the matrix, remove all risk impact scores relating to this control and then return to this screen and delete the control.
button allows you to delete the control currently being displayed; note however that if the control currently being displayed has already been scored in the matrix, i.e., one or more risks have been assigned to the control, then the system will not let you delete it, an error message to this effect will be displayed. To solve this, go to the matrix, remove all risk impact scores relating to this control and then return to this screen and delete the control.
The "Copy" button is very useful; in some cases, the nature of a control will be the same in several Entities; to avoid having to re-type the data you can make use of the “Copy” facility. Click on the button in the centre of the toolbar and the system takes a copy of the control currently open, by then moving to either a blank Control Screen in the current Entity (using “New”) or by going to another Entity altogether and opening up the first available blank Control Screen (again by using “New”) you will be presented with a “Paste” button in place of the “Copy” button; click this to paste the data into the new control environment.
By clicking on "Control Listing" in the toolbar you will be taken back to the Control Listing screen.
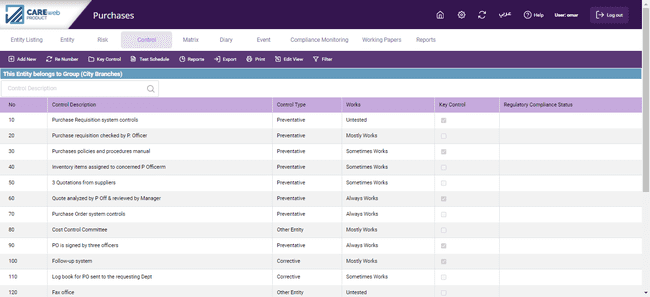
With all of the controls entered for a particular Entity, the Control Listing screen will look like this:

You can see:
•The control number;
•The short description of the control;
•The control type;
•Current status of the control (i.e. currently Untested or considered to be working Always, Mostly, Sometimes or Never);
•Whether the control is considered to be "key" or not;
•Control cost
•The current Regulatory/Compliance status (if available).