At the conclusion of the Planning process described above, you will have a list of audits that need to be performed and the number of man-days required to perform each audit. Armed with the knowledge of how many man-days you have available in the Internal Audit function it is simply a matter of arithmetic to decide which audits can be performed in the coming year.
Once the decision has been made as to which audits are to be done in the coming year, it is necessary to schedule them; this is done in the "Scheduling" element of the module. This function is accessed via the toolbar at the top of the screen; clicking on this brings up the following screen:
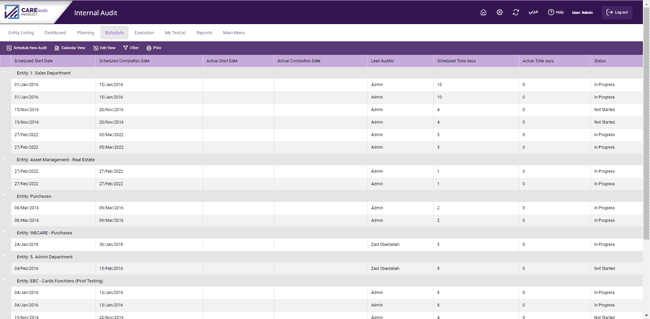
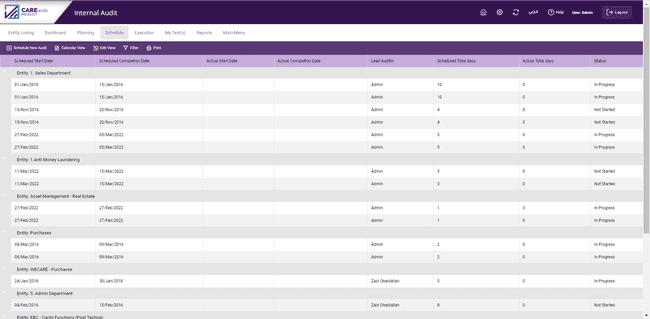
This is the "default" screen; the system always goes here first. The screen shows a list of all scheduled audits; obviously, if this is the first time this screen is accessed, then there will be no data to display. Scheduled audits can also be viewed in a calendar format by clicking on “calendar view” in the toolbar.

The “Calendar view” will show audits scheduled for the current month only, the user can view other months by clicking on the date appearing in the toolbar on top of the calendar. Note that the colour of each schedule is based on its status: green is for completed audits, yellow is for due/in-progress audits and red is for overdue audits. Double-clicking any audit, the system will show a detailed view of the audit.
To start scheduling your audits, click on "Schedule New Audit" on the far left of the toolbar at the top of the screen to bring up this screen:
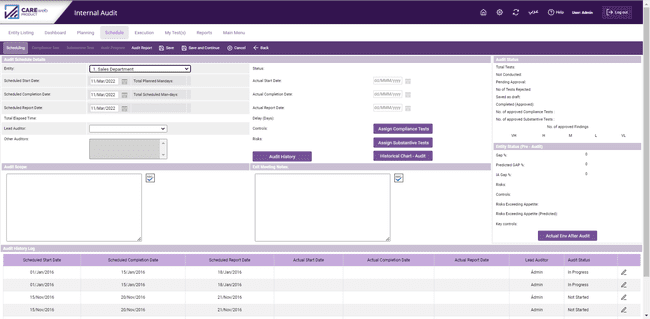
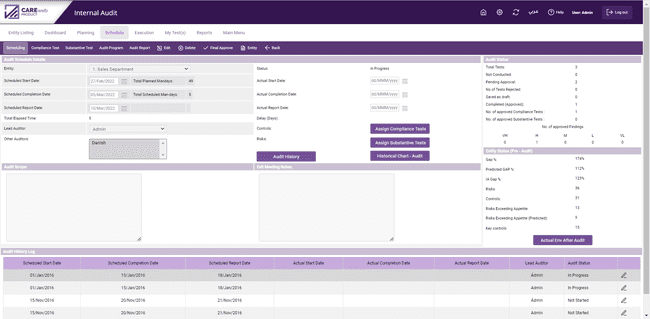
As you can see, the screen is divided into 2 parts (under the first part you have the left and middle panes and on the second part you have the right pane); in the left-hand pane, you can input the scheduled audit details and on the right-hand pane you get information about Audit status and relevant Entity details.
The Entity to be audited is selected from the drop-down menu, the relevant dates are selected using the now-familiar calendar, and the Lead Auditor is selected from the drop-down menu, which is itself populated based on the users we defined as “Internal Auditor”. The type of audit to be conducted (limited scope, full scope, fraud investigation etc.) is completed by treating the relevant box as a word processing screen.
Note:
- if the selected entity was not included in the Internal Audit plan the system will notify you indicating so. It is then important to go back to the planning screen and include the relevant entity in the plan at a later stage.

-If the audit visit period contains a holiday, the system will notify the user
Once the entity is selected the system will present useful information relating to the historical audits conducted on the entity.
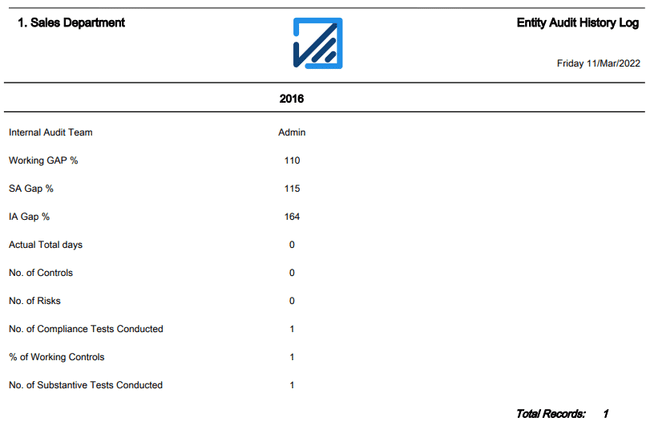
The Audit History function available in the middle pane of the screen generates the following data that pertains to the last audit conducted on the entity:
| - | The Internal Audit Team that participated in the previous audit. |
| - | The IA Gap % that was generated during the previous audit. |
| - | The actual field audit total days of the previous audit. |
| - | The number of controls that were within the entity profile during the previous audit. |
| - | The number of risks that were within the entity profile during the previous audit. |
| - | The number of compliance tests that were conducted during the previous audit. |
| - | The percentage of controls that were identified as “Always working” during the previous audit. |
| - | The number of substantive tests that were conducted during the previous audit. |

A report containing the information above can also be generated by clicking the “Audit History Log” report button as shown in the following screen.
The Audit Historical Chart feature also available in the middle pane of the scheduling screen generates a liner graph that highlights the changes that occurred on the IA GAP% for the selected entity as shown in the following screen:

The Audit History Log feature at the bottom of the scheduling screen allows you to view the complete historical audit(s) conducted on a particular entity, simply select the historical audit you wish to view the details for and the system will highlight the following details relating to it:
- Scheduled Start Date
- Scheduled Completion Date
- Scheduled Report Date
- Actual Start Date
- Actual Completion Date
- Actual Report Date
- Lead Auditor
- Audit Status
If this is a scheduling exercise and none of the audits are to commence yet (i.e. you do not wish to assign tests to auditors at that stage), simply click on "Save" in the centre of the toolbar at the top of the screen. Alternatively, you can click on “Save and Continue" and the system will take you to the following screen:
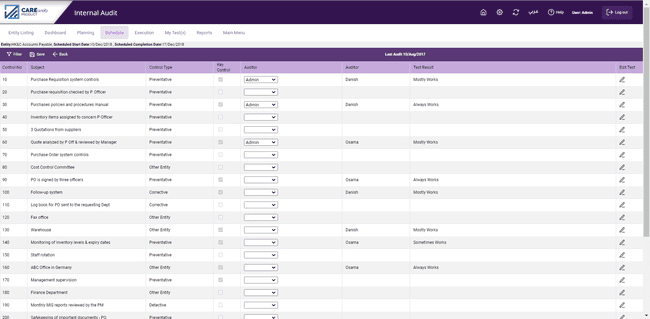
This screen shows a list of all controls within the selected entity. The drop-down menu beside each control provides a list of all auditors; simply select the auditor you wish to conduct the test. If an auditor is not selected for a particular control, the system will consider that it will not be tested in this Audit. The user can also view/edit the test details by clicking the “pencil edit” icon in the list. Upon assigning compliance tests to Auditors the system will also show the last audit test results and the auditor that conducted the test during the last engagement.
Clicking on “Save and continue” will save the entered data and take you to the risk listing screen. This screen works exactly like the control listing screen where you can select auditors you wish to conduct substantive tests. Clicking on “Save and continue” will save the entered data and take you to the “Scheduled Audits” screen.
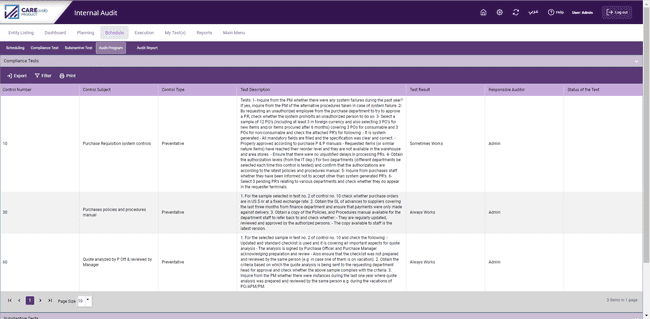
According to assigned test, user can also view the audit program as shown below:
So, you can see how a schedule for the entire year can be built up.
As audit work starts you will want to track progress; this is done using the centre panel of the Scheduling screen. On the list of scheduled audits, click on the Scheduled Audit you wish to update and the individual Scheduling screen will open:

Now click "Edit" in the centre of the toolbar at the top of the screen and the centre panel becomes "live"; if you want to make any changes in the scheduled tests or assign new tests to auditors, this can be done using the buttons "assign compliance tests" or "assign substantive tests". The “assign compliance tests” button will take you to the control listing screen and the “assign substantive tests” will take you to the risk listing screen.
The pane on the right-hand side of the screen shows high-level details about the Entity and the progress of testing; this is supplied automatically by the system.
In the left pane, the system will highlight the Total Planned Man-days and Total Scheduled Man-days.
In the middle pane, there is a word processing box at the bottom into which you can type notes for the Exit Meeting and any points arising from the Exit meeting.
The middle pane also records the actual start and end date for an audit and the actual report date. This data can be entered only once the Audit is completed (all assigned tests have been conducted and approved).
As we have seen above, various tests can be assigned to different auditors with the overall audit responsibility lying with the Lead Auditor. These responsibilities are set up at the Scheduling stage. Once audit work starts each individual auditor can document their progress against their own assigned tests. To do this they click on "My Test(s)" in the toolbar at the top of the screen; this brings up a list of tests for that auditor. The system knows which auditor's tests to display from the log-in name used when the auditor logs-on to the system. For example, if the auditor called "Danish" logged-on to the system and went to a particular Entity for which he had been assigned tests and clicked on "My Test(s)" the following screen would appear:
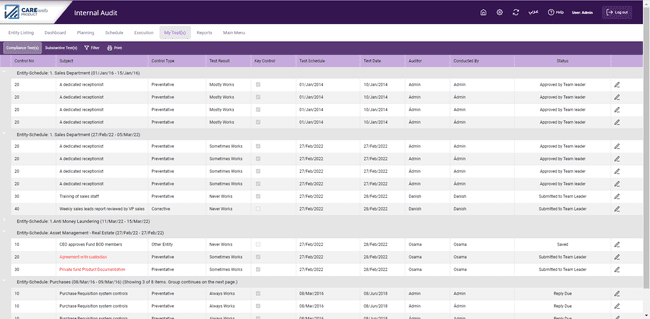
Note that only tests, assigned to "Danish " are appearing (penultimate column) despite the fact that many more tests are to be done for this Entity. The tests are split between Compliance and Substantive (see the two tabs in the left-hand corner of the toolbar at the top of the screen). If “Danish” is acting as the Lead Auditor for any scheduled audit, the tests requiring his approval will also appear in the list; A sign showing an exclamation mark will appear next to the “pencil edit” button indicating that this particular control/risk has been tested and is awaiting his approval.
For each assigned test, the auditor can now record their progress; for the test, you want to update simply click on the "edit pencil" in the final column to bring up the following screen:
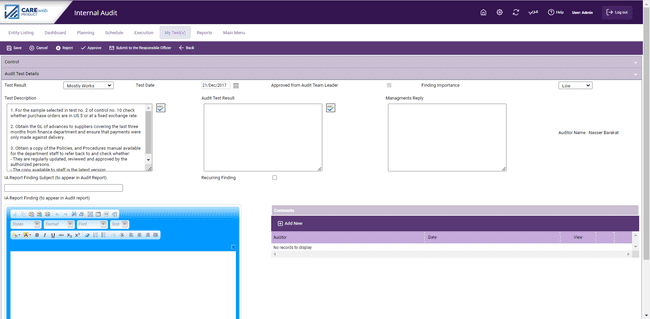
As can be seen, the screen contains a lot of components that are designed to ensure the proper documentation of the conducted tests, the results of the identified findings and Business unit replies on the findings. The following are the components of the screen:
1.Test result and date; Once testing is done, the auditor can from a conclusion as to the standard of deployment of the control, i.e. is it working Always, Mostly, Sometimes or Never; this conclusion is entered into the screen via the drop-down menu in the box at the top left-hand side of the screen marked as "Test Result". The "Test Date" box is completed automatically by the system.
2.Test Description; This word processing box shows the details of the test to be conducted (this test was entered at the Control screen level or upon assigning the test for the auditor).
3.Audit Test Results; using this word-processing box the Auditor can document any results that he would like the Audit Team Leader to review, but at the same time, he does not wish these results to appear in the Audit Report generated by the system.
4.Recurring Finding; this checkbox allows the Auditor to mark findings that were noted in the previous audit conducted on the entity.
5.IA report finding subject; this word processing box is designed to allow the auditor to provide a brief description of the noted finding. The finding subject entered in this box will appear in the Audit Report generated by the system.
6.IA Report Finding; is another word processing box that allows the Auditor to enter the full details of the noted findings. The IA report finding box can be edited, formatted and tables can be easily inserted. The Data entered in the IA report finding will appear (in the same format) in the IA report generated by the system.
7.Comments; allows the Lead Auditor to note his review comments for the auditors upon reviewing their results. To add a new comment, click on ![]() and the system will present you with a word processing box. Once you are done with documenting your comments click on save. All comments added through this function are logged.
and the system will present you with a word processing box. Once you are done with documenting your comments click on save. All comments added through this function are logged.
8.Finding Importance; allows the auditor to indicate the severity of the noted finding. The auditor can select whether the finding is considered to be “Very High, High, Medium, Low or Very Low”. The selected finding importance is reflected in the IA report generated by the system.
9.Management reply; Auditor can easily share the finding with the business unit manager through the system and obtain his/her reply
You would note that several tabs are available at the bottom of the screen. These tabs are described in their order below:
![]()
Affected Risk
This shows all of the risks for which the control is providing some mitigation. It shows:
•The risk subject;
•The impact and probability of each risk;
•The asset affected if the risk occurs;
•The "score" assigned to the control indicating its strength in mitigating the risk in question (this is on a scale of 1-5 and is described in the Matrix section above).
•Key Control: This field is used to classify a control as a “key control” in mitigating that risk.
•IA Use working: If the auditor believes that the control is working for a particular risk regardless of the “Test Result” for the control, then he can place a tick mark in the IA Use Working field for that particular risk.
Diary
The auditor can also make recommendations for improvements during his work. This is done using the "Diary" tab at the bottom of the " Tests" screen. Clicking on this and then clicking on "Add New" opens up the Diary Entry screen discussed earlier in the manual.
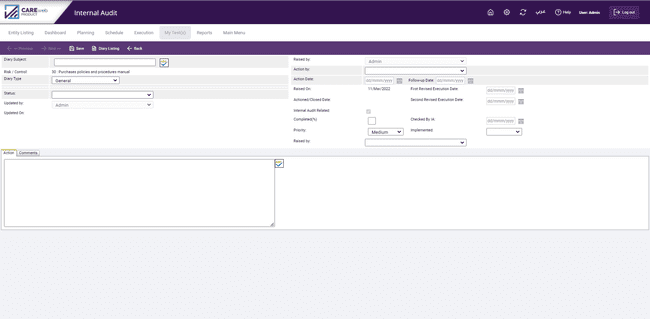
The Internal Audit department can state the status of the recommendation i.e. whether it has been raised in draft, Open, Under Query, Actioned or Closed by just clicking the “Status” as shown in the following screen.

The Internal Audit department also has the ability to document its comments on the recommendation and the system will maintain a log of all comments along with the dates they were entered on the system as shown in the following screen:

If during the engagement the Internal Auditor noted that the business unit did not implement the recommendations and revised execution dates were agreed for the recommendations. The Internal Auditor can document these in the “First revised execution date” and “Second revised execution” date fields.
In addition, the auditor can document the date the auditors checked the status of the recommendation by using the checked by IA date field.
Working Papers
The auditor will almost certainly want to attach some working papers to show how their conclusion was arrived at; there is a provision to do this at the bottom of the screen, the method of setting up new working papers and uploading others has already been described in the Risk and Control sections of this manual.
Test log tab
A “Test log tab” is available at the bottom of the compliance/substantive test execution screen. The test log tab highlights the following:
- Historical test results for a particular risk/control
- The historical test dates.
- The auditors who previously tested the control/risk.
- Whether a finding relating to the control/risk is recurring and the date of previous recurrences.

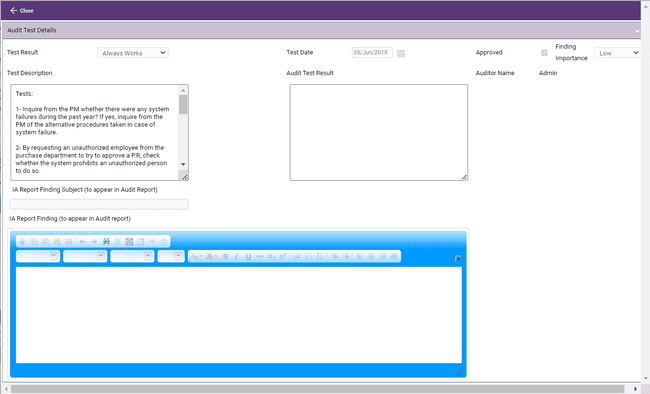
If you would like to obtain more details with regards to the historical test (i.e. the test description), then simply select the historical test you would like to retrieve the data for and the system will present you with a pop-up screen containing all the details of the previous test as shown in the below screen:
Related Regulation
The Related Regulation tab allows viewing the regulations linked to the control/risks that is being tested.
Once all of the data has been entered in the test screen the Internal Auditor can perform either one of the following actions:
1. Click "Save" and the system will record the details entered, save it and return you back to My Test(s) screen. In this case, the test will not be submitted to the Lead Auditor to obtain his review and approval on the test results.
2. Submit the test to the Lead Auditor to obtain his review and approval by clicking on “Submit to Audit Team Leader”. In this case, the system will also return you back to My Test(s) screen.
Upon receiving the test results submitted by the Auditors, the Audit Team Leader can perform either one of the following actions:
1- Approve the test, and in this case, the team leader can send the finding directly to the responsible person within the Business Unit through the system by clicking on the ![]() button available in the toolbar at the top of the screen.
button available in the toolbar at the top of the screen.
2- Reject the test by clicking on the ![]() button available in the toolbar at the top of the screen. In this case, the test will return back to the auditor who conducted the test for him/her to revise it.
button available in the toolbar at the top of the screen. In this case, the test will return back to the auditor who conducted the test for him/her to revise it.
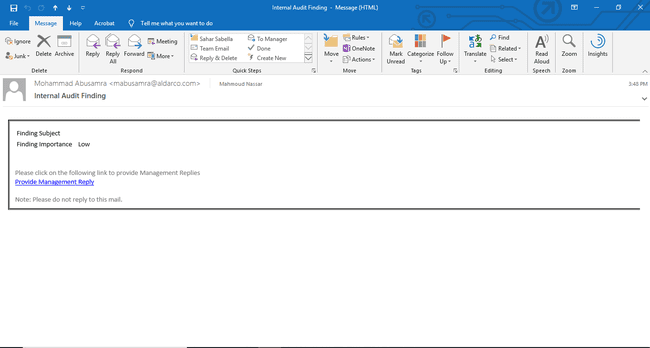
If a finding was submitted to the Responsible Officer through the system. The responsible officer will receive an email requesting him to provide his reply on the finding by accessing a link that will direct him/her to that particular finding:
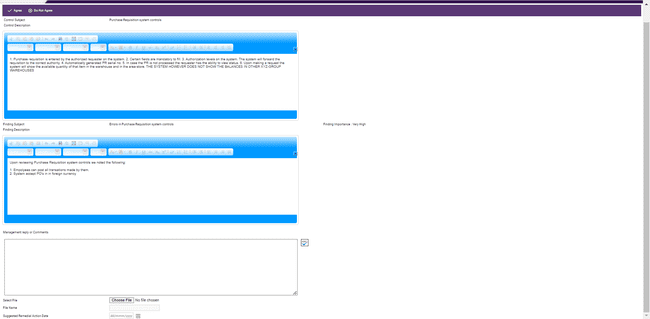
Once the responsible officer accesses the link to the finding, he/she will be presented with a screen that outlines the finding subject and description. The responsible officer can then document his reply, attach evidence and suggest a deadline date to implement the remedial action.
Now if we go back to the Scheduled Audit, and open the same Entity in the Scheduling screen, the following will be noticed:

Note:
•The status has changed from "Not Started" to "In Progress";
•2 tests are now showing in the far right-hand column as "Pending Approval".
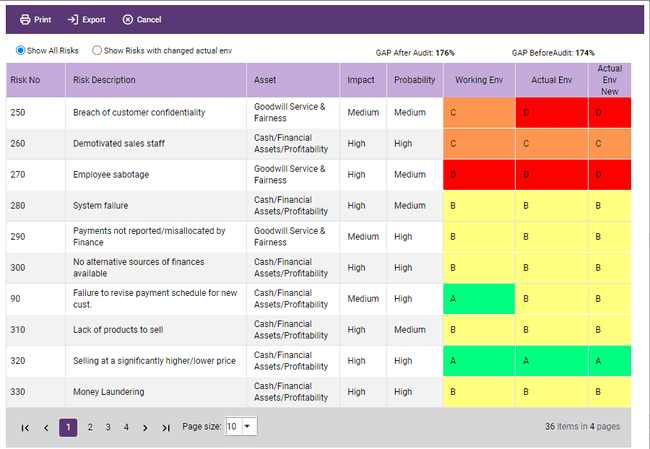
At any point during the audit, if the auditor wants to see what the impact of his audit will be on the control environment for the entity, he can click on ![]() in the bottom right-hand corner of this screen and the system will present the following screen:
in the bottom right-hand corner of this screen and the system will present the following screen:
