Schedule – This tab is used to enter the frequency of the activity in accordance with the following options:
•Daily: the user is required to specify the time of the day the activity will be conducted at.
•Weekly: the user is required to specify the day and time of the activity.
•Monthly: the user is required to specify the day of the month and time of the activity
•Quarterly: the user is required to specify which month and day in the quarter and time the activity will be conducted at.
•Yearly: the user is required to specify which date in the year and the time the activity will be conducted at.
There is an option in the parameters section in the “Administration screen” to define weekends, the system will prevent the user from scheduling any activities on a weekend
Related Controls – From this tab, the user can select the controls that he/she would like to be tested during this activity.

Please note that an activity should be linked with at least one control.
The next 3 tabs appear after you have added the Activity and clicked on "Save":
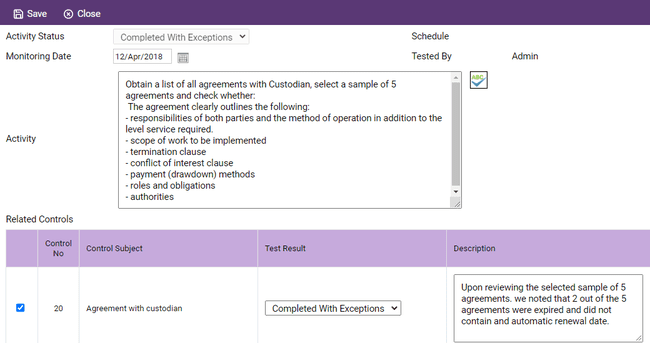
Monitoring Schedule – This tab lists the tests that are scheduled for this activity. They will be generated automatically based on the schedule defined in the “Schedule” tab. However, the user may also add an unscheduled test by clicking the Add New button. Click on this button and you will get the following screen.

In the first instance, the boxes will be blank and the user needs to document the tests that will be conducted in the Activity. Position the cursor in the box and treat it in the exact same way as a word processing screen.
Currently, the activity status will be “Not Started” because the test has not started yet. This status is generated automatically by the system; the monitoring date will be defaulted to the current date but you can use the calendar beside this field to enter a date. The fields for “Schedule” and “Tested by” are system generated and not available for input.
“Schedule” will show the date/time on which the test was actually scheduled to be performed and it will be empty if the test is unscheduled
In the subsection of this screen, there is a list of controls that were linked with this activity in the previous stage. For each, control the user can provide a “Test Result” and “Description”; in the “Test Result” the following test result/control statuses are available for the user to select from:
•Not Started
•Compliant
•Partially Compliant
•Non-Compliant
Note that any control that is marked as “Partially Compliant and non-compliant” will be highlighted in Red on the Control Listing Screen and Matrix.
Click “Save” in the top left-hand corner of the toolbar to save the record.
After saving the record, the “Activity Status” will be automatically populated by the system based on the following criteria.
The Activity Status will be, “Not Started” – The testing activity has not started yet. Accordingly, the results are not available. “Compliant” – When the test is completed and the control(s) is working as intended. “Partially Compliant” – When the test result for the control is Completed but the control is partially not working as intended. “Non-Compliant” – When the test result for the control is Completed but the control is not working as intended. |
If the “Activity Status” is entered as “Partially Compliant or Non-Compliant” the system will bring following prompt screen:
![]()
“No” will simply close the screen while clicking on “Yes” will take the user to the diary screen.
Diary - This tab works in exactly the same way as the one on the Risk Screen and the detail of its access and use can be found there.
Working Papers - if there are supporting documents for the activity, they can be stored in the system using this tab. The format and operation of this function have already been described in the Risks and Controls sections of this manual.
The ![]() tabs at the top left-hand side of the toolbar move you around within the defined Monitoring Activities, moving the user one Activity forward or backwards per click.
tabs at the top left-hand side of the toolbar move you around within the defined Monitoring Activities, moving the user one Activity forward or backwards per click.
The ![]() button will allow you to print what is on the screen;
button will allow you to print what is on the screen;
The ![]() button allows you to delete the activity currently being displayed;
button allows you to delete the activity currently being displayed;
The ![]() button works in the exact same way as it does in the Risk and Control screens.
button works in the exact same way as it does in the Risk and Control screens.
The ![]() button will bring up the following screen:
button will bring up the following screen:

This screen is to assign the “Activity” to another user, the assignment can be permanent or temporary. For a temporary assignment, the user has to select the ![]() box and enter the date range during which the temporary assignment is to be applicable; after that period, the system will automatically assign the activity back to the original assignee.
box and enter the date range during which the temporary assignment is to be applicable; after that period, the system will automatically assign the activity back to the original assignee.
Click on "Save" button to save the record, and return to the “Activity” screen; clicking on "Compliance Monitoring" in the purple toolbar gets you back to the "Monitoring Activities Listing" screen.