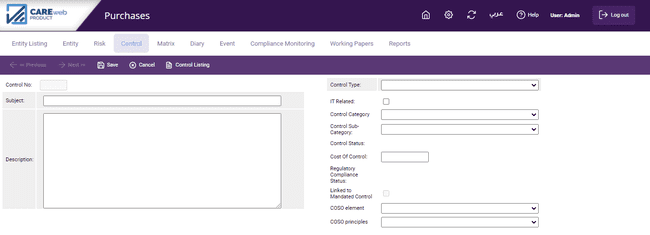
If this is a new Entity there will not be any controls entered yet, to enter controls Click on "Add New" and the Control Screen will appear:

The components of the control screen are as follows (Mandatory fields are highlighted in grey):
Control No. - This number is system-generated, it starts at ten and goes up in increments of 10; this is to allow the user to insert related controls in order at a later date.
Subject - This field is intended to record a brief description of the control; it appears in all of the CAREweb™ printed output and therefore the subject needs to be meaningful in its own right.
Description - This is field is intended to provide a fuller description of the control set out in the short description.
Control Type - Use the down arrow to select from a menu so as to detail whether the control is:

Where a control is described as “Other Entity” this means that the control happens outside of the function being profiled; for example, if Finance check all invoices prior to the Bought Ledger Department paying them, then Finance is an “Entity” control in the Bought Ledger Department’s Risk Profile. It is important to know this since, if later testing of controls in Finance show weaknesses those weaknesses may have an impact on other Entities relying on Finance to provide some part of their control environment. If “Other Entity” is selected another box will appear called “Related Entity”:

You can then use the downward pointing arrow to show a list of all Entities in the database; select the Entity required and click on it to enter the data. If the Entity has not yet been set up simply leave the box blank (this is not a mandatory field) since you can always come back and populate it later. A control might act as a Preventative control over some risks but, say, a Deterrent control over others. Since the system only allows one category, in these cases always use the highest category,
Control Category - once you have defined the control categories in the reference section, you will be able to select the relevant category in which the control relates to (i.e. if you want to report on controls over financial reporting then categories the applicable controls under the financial reporting category and later on you will be able to report on these controls separately).
Control Sub-Category – Defined in the reference section, this drop down shows the subcategories related to the category chosen.
IT Related – If this box is ticked, the IT related control categories and subcategories, previously defined in the reference section, will appear here depending on the IT framework chosen.
Control Status - this data is system generated; it shows the current situation of the control regarding its operation. Initially this is blank because no testing of control has yet taken place.
Cost of Control - if you are aware of how much a particular control is costing the organisation, perhaps through the work of an Activity Based Costing (ABC) exercise, you can capture it here for use at a later time.
Regulatory Compliance Status - this data is system generated; it shows the current regulatory compliance situation of the control regarding its compliance operations as per the compliance monitoring activities.
Linked to Mandated control - This is not available for input; it is determined by the system if the control is linked to a Mandated Control (explained in Compliance Monitoring section of this manual).
COSO Element and Principle - you can categorise the control as per COSO’s elements and principles from these two drops down lists.
There is one screen for each control captured.
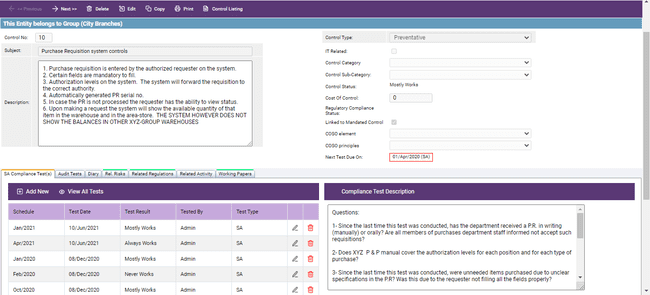
A completed Control Screen looks like this:

Tip: if you wish to insert a blank control line in your matrix or printed output, or you have started to capture a control in a workshop environment but need to move on before finishing it, the edits in the system would normally insist on the mandatory fields being completed. To get around this, put a full stop in both the long and short description fields, and highlight any of the control types. This allows you to move on and you can then come back to this screen at a later date if required. |
It is important to record as much detail as possible about how the controls in the system are to be tested to ensure they work as intended along with the results of the testing conducted. The system allows for 2 types of control testing:
•Self-Assessment Compliance Tests, usually done by the staff of the Business Unit in question
•Audit Tests
The results of each type of testing can be recorded separately using the tabs at the foot of the Compliance screen.